High Intensity Does Not Equal High Risk Of Injury

Every once in a while I come across an article by some well-meaning but ignorant trainer warning people of the dangers of training to failure.

If the point of failure is defined as the moment where it is no longer possible to continue an exercise in the prescribed form, then there is nothing dangerous about training to failure. Unless there is a pre-existing injury or condition which would contraindicate performance of the exercise to begin with, risk of injury only increases when one attempts to continue an exercise beyond the point where they are capable of using proper form.

Due to the greater physical and mental demands of to-failure training, a lower volume of work is necessary. I strongly suspect many of the beliefs about problems with training to failure, such as concerns over injuries, CNS “burnout”, etc., are probably the result of people attempting to train with a high level of intensity without an appropriate reduction in training volume.

I’ve been training people using high intensity training methods for over 15 years, and the majority of my clients train to failure almost all of the time after their first few weeks. None of them have ever been injured as a result, and this includes clients with various neck and lower back problems. There is no merit to the claim that training to failure in and of itself leads to or is associated with injury, and while trainers who say so may mean well, they are mistaken.

Strong Enough?

One of my older clients, an 84 year old golfer, recently asked when I would stop increasing the weights he uses in his workouts. I told him I’d stop increasing the weight if he ever stopped getting stronger, but that I thought he underestimated his potential and would probably continue to improve for quite some time. He then asked how strong I expected him to get, to which I replied “as strong as possible”.

His primary concern is maintaining his health and mobility, and his golf game is also a big priority. Both have improved considerably since I’ve been training him and he’s happy with his current level of strength and condition. However, I do not believe in just being “strong enough” because you never really know what “enough” will be for everything life might throw at you. What may be “enough” strength for your normal daily routine or typical physical activities may turn out to be far too little under different circumstances, and it’s better to be stronger than you need to be 99% of the time than not strong enough during that 1% when it might really count.

Unless you are omniscient and know all the challenges you will face in your life there is no such thing as strong enough. Stay hungry. Focus on consistent, gradual progression in your workouts and always strive to become at least a little stronger than before.

Question: After reading your article on 3×3 workouts I have been doing a 3×3 (squats, chins, dips) and am liking it very much. How long would you do a 3×3 specific routine and then how long would you do 3×3 before going back to a traditional HIT routine?

Do you see 3×3 as a good type of routine to perform occasionally or more long term?

Answer: If you are performing 3×3 routines exclusively or frequently I recommend rotating exercises every workout or at least every other week, so that you can incorporate more variety of movement and more direct work for different muscle groups. You should alternate between upper body pushing and pulling movements in different planes and between pushing and pulling lower body movements.

I prefer pairing pushing and pulling movements in similar planes, such as presses and chin ups, or dips and rows. Due to the greater overlap in muscle involvement between horizontal and low rowing movements and deadlifts, when deadlifting I recommend vertical pulling movements. For example:

Routine A:

  1. Barbell Squat
  2. Weighted Dip
  3. Barbell Row

Routine B:

  1. Trap Bar Deadlift
  2. Barbell Press
  3. Weighted Chin Up

Although there is little variety within a single 3×3 routine, the routines can be varied quite a bit depending on the equipment available to you and your capabilities.

Whether you perform 3×3 routines occasionally or as the core of your program depends on your goals, the equipment available to you and the environment you train in. Conventional bodybuilding-oriented and 3×3 high intensity training routines are both effective for improving muscular strength and size and cardiovasular and metabolic conditioning. However, 3×3’s are more geared towards conditioning, while a well rounded bodybuilding routine will include some isolation work for smaller muscle groups, depending on the needs of the trainee.

Humans are “lazy overeaters”

The following is my response to a post on another blog about why people crave bad foods. It references something Arthur DeVany said on his Evolutionary Fitness blog about humans evolving to be “lazy overeaters”, which I agree with:

Arthur DeVany suggested a big part of the reason for overeating is that we evolved to be “lazy overeaters”, which makes perfect sense in a pre-agricultural environment, where calories are scarce and require effort to obtain. For 250,000 years or so, our human ancestors (or a few millions of years if we include our pre-human ancestors going back to the australopithecines) had to forage or hunt for food, and when they found some had to eat what they could, not being certain of when they’d find or kill their next meal. There was no McDonald’s around the corner, no fridges full of hot pockets. In such an environment, it makes perfect sense to conserve energy (be “lazy”) and eat as much as you can when you find it.

The environment has changed dramatically, but from a genetic standpoint we haven’t, and over the past few decades, the effort required to obtain high calorie foods has continued to decrease. It is no longer necessary to spend time baking cookies or cakes or preparing big meals from scratch, which may have been a deterrent to overeating for some. If you wanted a slice of cake or a pizza you had to make it yourself.

The food industry has made it possible to now obtain massive amounts of calories with barely any effort, so being a “lazy overeater” is now a threat to one’s health rather than a necessity for survival.

I imagine if we turned the clock back only a few decades and got rid of the majority of packaged foods, fast-food restaurants and delivery services and convenience stores so people had to at least spend some time and effort making their own food, there would be far fewer obese people, since they wouldn’t have the ability to stuff their faces on a whim.

Evolutionary biologist Theodosius Dobzhansky wrote an essay titled “Nothing in biology makes sense except in the light of evolution”, and since exercise and nutrition are biological sciences, the same could be said for them. While I don’t agree with all of Art DeVany’s exercise recommendations, I believe his thinking on exercise and nutrition, as well as Loren Cordain’s writings on the paleolithic diet, are a big step in the right direction.

As for having evolved to be lazy overeaters, this does not mean humans are doomed to be fat, slow and weak as so many of our population have become, because we evolved something else – a highly developed ability to reason. We are not controlled by instinct. Influenced, perhaps, but not controlled. We have the ability to consider the consequences of our actions and whether they are consistent with our values and to act accordingly. If we value being strong, fit and lean we can choose not to do things which would result in consequences inconsistent with those values, like overeating and being lazy. We can choose to eat a healthy diet, we can choose to be active and to exercise intelligently. We are not slaves to our whims and impulses. Unlike animals, we are capable of self-discipline.

So while biology may predispose us to the kind of behaviors that have contributed to the current epidemic of obesity, it is not an excuse. The choice is yours.

Resistance Exercise Reverses Aging in Human Skeletal Muscle

Doug McGuff, MD recently posted an article on the effects of resistance training on aging, calling attention to a study published in PLoS ONE showing a reversal of aging in over 500 genes. (Melov S, Tarnopolsky MA, Beckman K, Felkey K, Hubbard A (2007) Resistance Exercise Reverses Aging in Human Skeletal Muscle. PLoS ONE 2(5): e465. doi:10.1371/journal.pone.0000465)

Abstract

Human aging is associated with skeletal muscle atrophy and functional impairment (sarcopenia). Multiple lines of evidence suggest that mitochondrial dysfunction is a major contributor to sarcopenia. We evaluated whether healthy aging was associated with a transcriptional profile reflecting mitochondrial impairment and whether resistance exercise could reverse this signature to that approximating a younger physiological age. Skeletal muscle biopsies from healthy older (N = 25) and younger (N = 26) adult men and women were compared using gene expression profiling, and a subset of these were related to measurements of muscle strength. 14 of the older adults had muscle samples taken before and after a six-month resistance exercise-training program. Before exercise training, older adults were 59% weaker than younger, but after six months of training in older adults, strength improved significantly (P<0.001) such that they were only 38% lower than young adults. As a consequence of age, we found 596 genes differentially expressed using a false discovery rate cut-off of 5%. Prior to the exercise training, the transcriptome profile showed a dramatic enrichment of genes associated with mitochondrial function with age. However, following exercise training the transcriptional signature of aging was markedly reversed back to that of younger levels for most genes that were affected by both age and exercise. We conclude that healthy older adults show evidence of mitochondrial impairment and muscle weakness, but that this can be partially reversed at the phenotypic level, and substantially reversed at the transcriptome level, following six months of resistance exercise training.

The full paper can be read here.

Towards the end of the intruduction, the paper states,

“We report here that healthy older adults show a gene expression profile in skeletal muscle consistent with mitochondrial dysfunction and associated processes such as cell death, as compared with young individuals. Moreover, following a period of resistance exercise training in older adults, we found that age-associated transcriptome expression changes were reversed, implying a restoration of a youthful expression profile.”

Note they didn’t say resistance training slowed or stopped the age-associated transcriptome (set of genetic instructions for how to build proteins) expression changes – it reversed them. Like Dr. McGuff stated in his article, this is the closest thing there is to a fountain of youth. If everybody regularly engaged in proper strength training we’d have an elderly population far healthier, more independent, and enjoying a much greater all-around quality of life. Barring accidents, diseases and other disasters, most would probably also live significantly longer.

Dr. McGuff also made an interesting observation based on the study that the low-intensity, long-duration aerobic “exercise” so often recommended as healthy activity may actually contribute to aging:

“If we embrace this concept of aging (the gap between maximal and minimal output), and the type of training that enhances this capability; then we must acknowledge that there is a type of exercise which can produce the opposite result.  Low intensity, steady state exercise will actually accelerate aging by this definition.”

The explanation that follows is probably one of the strongest arguments I’ve read against traditional low-intensity, long-duration cardio. It’s too long to post here, so I strongly recommend going there and reading it. In a nutshell (and greatly oversimplified) the changes resulting from low-intensity, long-duration exercise may interfere with the type of exercise adaptations the above study has shown to reverse age-associated transcriptome expression changes.

How To Get Ripped Abs

Contrary to popular belief, it is neither necessary nor beneficial to perform dozens of high rep sets of a wide variety of abdominal exercises. You also don’t need different exercises for your lower and upper abs, and you don’t need stability balls, special slings, benches, or any other gimmicky crap. In fact, you don’t need any direct abdominal exercise at all to get ripped abs. All that is necessary is to reduce body fat to very low levels, and that has far more to do with diet than exercise.

Drew Baye

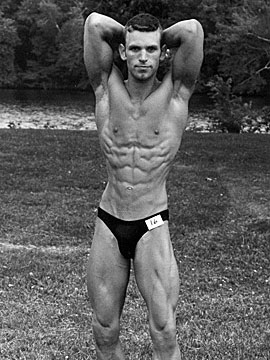
Drew Baye 1995 NGA Midwest Bodybuilding Classic

Regardless of the strength or development of your superficial abdominal muscles, if your body fat level is low enough they will show good separation due to the muscle being divided into distinct “blocks” by lines of connective tissue. I performed no direct abdominal exercise for over half a year prior to the photo to the left being taken, yet had extremely good abdominal definition simply due to having reduced my body fat to the low single digits. My routine during that time was very basic, especially compared to the kind of unnecessarily complex routines being promoted by the internet ripped abs “experts”. It consisted of of only one set each of stiff-legged deadlifts, leg presses, pulldowns, chest presses, rows, and calf raises, along with occasional barbell curls and cable tricep press-downs. No crunches, sit ups, leg raises, knee raises, planks, twists or bends of any kind.

Indirect Effect

If you regularly perform chin-ups, pull-ups (especially with additional weight), heavy pull-downs, pullovers, standing presses or even just very heavy cable tricep press-downs, your abdominal muscles receive quite a bit of indirect work stabilizing the body during those exercises. Little additional abdominal work is necessary, and the primary benefit of any additional direct abdominal work is improved trunk strength for better stability in other movements and for protecting the spine, not the appearance of your abs. Abdominal muscle development makes absolutely no difference at all if body fat levels are not low enough. Your primary purpose for training abs should be performance and spine health, and not appearance. [continue reading…]

This morning during a phone conversation with Greg Anderson the subject of the previous post on the effect of hand position on triceps involvement came up.. Greg mentioned, and I agree, hand position makes little difference to arm flexor involvement during curling and pulling movements as well.

Articles on arm training in bodybuilding magazines and web sites often make claims of different hand or shoulder positions or grip width having the effect of isolating or emphasizing one head of the biceps or a particular arm flexor (i.e. incline curls to target the long head of the biceps, hammer curls to target the brachioradialus, reverse grip curls to target the brachialis, etc.). While there is some truth to this – changes in hand or shoulder position affect the relative length and thus the ability of some of the elbow flexors to produce force – the effect on muscular development is greatly exaggerated.

Regardless of hand or shoulder position, if the resistance is heavy enough, all of the motor units in all of the involved muscles will be recruited and stimulated. Any difference in involvement is most likely not enough to make a significant difference in overall development over the long term. Because of this, hand and shoulder position during curls or pulling exercises should be based on what will allow the heaviest weight to be used with proper form to place the greatest demand on all of the muscles involved, as well as what is safest and most comfortable for the trainee’s wrists and elbows.

A supinated or neutral hand position is best during curling exercises for the same reason pronated or neutral is best during tricep exercises – they allow heavier weights to be used more safely. Some people claim a more supinated position will provide better stimulation for the biceps – which supinate the forearm in addition to flexing the elbow – as a basis for recommending using a straight bar for curls, or a wider hand spacing for chin ups.

You can not curl as much with a pronated grip as you can with a supinated or neutral grip partly because of the change in biceps length, but also in large part because the forearms are weaker in extension than they are in flexion or abduction/ulnar deviation and your grip may be a limiting factor.

Most people can lift more weight in wrist flexion than arm flexion, but less in wrist extension. When you perform a reverse curl, forearm extensor and grip strength becomes a limiting factor. Your arm flexors are not being worked nearly as hard as your wrist extensors and grip. Great forearm/wrist extensor work, but not ideal for upper arm development.

Hand position and especially grip spacing would have a greater effect during pulling movements than curling movements, mainly because these affect the range of motion and the relative involvement of the different back muscles acting on the shoulder. If the grip is too narrow or too wide the range of motion around both the elbows and shoulders is reduced, and different hand spacing, plane of movement, etc. affects the leverages of the involved muscles more significantly. For pulling movements, like curling, the best hand position and spacing is whatever allows the heaviest weight to be used in a manner that effectively loads the targeted upper back muscles, as well as what is safest and most comfortable for the trainee’s wrists, elbows and shoulders.

So what does this mean in terms of practical application? Don’t get caught up in all the pseudo-scientific bodybuilding magazine nonsense about using various hand and shoulder positions or grip widths to isolate a particular arm flexor or bicep head. Just focus on becoming as strong as possible on a few basic, heavy curling and pulling movements. My recommendations for curling and pulling movements:

  • Standing straight or EZ-bar curls or a suitable arm curl machine with a regular (supinated), approximately shoulder-width grip.
  • Dumbbell curls with a regular or neutral (AKA “hammer”) grip.
  • Chin-ups or underhand (supinated) grip pull-downs with a shoulder-width grip.
  • Parallel-grip pull-ups with a grip just outside of shoulder width.
  • Barbell rows with a shoulder-width grip. These are typically performed with an overhand (pronated) grip, but use whatever hand position your wrists and elbows are most comfortable with.
  • One-arm dumbbell rows with a neutral grip.
  • Cable or machine rows with a shoulder-width grip.

Keep in mind that parallel grip and neutral grip are not necessarily the same. Hand position is considered relative to forearm position, and whether a parallel grip (palms facing each other) is a neutral or a supinated grip depends on arm position. During a curling or pulling movement where the arms are moving in the sagital plane a parallel grip would be neutral and an underhand grip would be supinated, but during a pulling movement like parallel-grip pull-ups where the arms are moving in a coronal plane a parallel grip would be supinated and an overhand grip would be neutral.
Q&A: Neck and Head Pain During Barbell Squats

Question:

The previous workout when performing squats I was close to failure when I started to get a intense pain in my neck and the back of my head ( I had this again last night during squats). My training partner believes my head and neck position is too far back causing me to tense my upper back and neck very hard on the eccentric part of the squat causing pain where the neck tendons attach to the skull. Has any of your clients had this problem? What do you recommend?

Answer:

Hyperextending the neck is a common fault during barbell squats and may be a large part of the reason you are feeling the pain in your neck. As you descend and the hip angle decreases, if you continue to look straight ahead your neck will extend significantly by the time you reach the bottom position. The head and neck should remain in a neutral position relative to the body throughout the exercise. The chin should be just slightly down. Imagine you are holding a tennis ball between your chin and sternum, and maintain that position.

The bar may also be positioned too high. During barbell squats, the bar should be positioned just over the spines of the scapulae, on the traps and rear delts, and not higher on the traps on the back of the neck. When the bar is placed high on the traps, it tends to place a lot of pressure on the spinous processes of the seventh cervical or first thoracic vertabrae, which can cause serious damage over time.

Keep your head in a neutral position, the bar lower on the traps/back of the rear deltoids just above the spines of the scapulae, and you should no longer feel any pain in your neck during squats.

I recently read an article on a bodybuilding web site about arm training that recommended performing various tricep exercises using both underhand and overhand grips. While different hand positions will have an effect on the involvement of the muscles in the forearms due to differences in the demand on grip and wrist stabilization, they have no significant effect on triceps involvement.

Hand pronation and supination are accomplished by rotation of the radius at the elbow, crossing over the ulna during pronation and returning to a position parallel to the ulna during supination. The triceps, which extend the elbow by pulling on the olecranon process of the ulna, are not affected by this.

You can’t isolate or emphasize the medial, lateral or long heads of your triceps by varying hand position.

What hand position does affect is the strength of the grip, and as a result the safety of the exercise when performed with a relatively heavy weight. When a supine grip is used during tricep extension, the strength of wrist extensors and grip become a limiting factor. You can handle far more weight during elbow extension than wrist extension, and the further the wrists flex as the extensors fatigue, the more difficult gripping becomes due to muscular insufficiency of the wrist/finger flexors and poorer leverage of the thumbs. During either bench or standing tricep extensions with a barbell a failed grip can have disastrous results. None of these problems occur if a pronated grip is used, or if a neutral grip is used with handles designed for it, in which case the handle or part of it is pressed against by the palm or edge of the hand.

Hand position is even more important during pressing exercises which are typically performed with much heavier weight. While the forearms remain parallel to the pull of gravity the bar or handles will be supported by the heels of the palms, but if the elbows are allowed to flex too far, the same problems occur as during extension.

During almost all upper body pressing and tricep exercises, either a pronated or neutral grip should be used. Unlike hand position, the degree of shoulder flexion can have a slight effect on the contribution of the long head of the triceps to elbow extension, since unlike the medial and lateral heads which originate on the humerus and only act on the elbow joint, it originates on the infraglenoid tubercle of the scapula. Extreme shoulder extension should be avoided since it places the long head of the triceps in a position of muscular insufficiency, reducing it’s ability to contribute to elbow extension.

DIY Parallettes

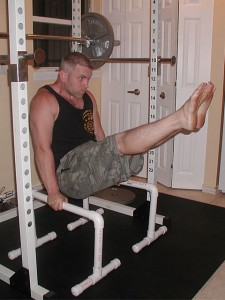
L-Sit on ParallettesParallettes are a gymnastics training tool which can be used to simulate some movements performed on parallel bars as well as a variety of bodyweight exercises such as L and V sits, planches and a variety of push ups and pressing movements. While various models are available commercially, they can be easily built for much less with commonly available materials such as wood or PVC piping.

I built the set pictured for a little over $20 using 1 and 1/4 inch schedule 40 PVC piping in a little under 30 minutes, with nothing but a tape measure, a sharpie and a small hacksaw. Schedule 40 PVC is light weight, strong, and easy to work with. While some people recommend building them with only 1 inch PVC, a larger diameter will be stronger and more comfortable to grip. If you are very heavy you may even want to go up to 1 and 1/2 inch, although I currently weigh about 190 and mine barely flex under my weight.

Materials:

  • 10 foot schedule 40 PVC pipe (I recommend a minimum diameter of 1 and 1/4 inch)
  • 4 elbows
  • 4 tees
  • 8 caps

Tools:

  • Hack saw or pipe cutter
  • Tape measure
  • Marker
  • Miter box (optional, but highly recommended)
  • PVC glue (optional)

Construction

The PVC pipe will need to be cut into 14 pieces: 2 bars, 4 uprights, and 8 feet. While the dimensions are not set in stone and you may wish to modify them, the following can be cut from a single 10 foot pipe with a few inches to spare.

  • Two 18 inch pieces for the parallel bars
  • Four 8 inch pieces for the uprights
  • Eight 6 inch pieces for the feet

Connect the parallel bars to the uprights using the elbows, then connect the feet to the uprights using the tees and cap the ends of the feet. I recommend gluing all parts together, but you must be very careful when connecting the uprights to the parallel bars that they are in the same plane, as the glue can set very quickly. I recommend attaching the elbows to the uprights before the parallel bars, and lining them up on a flat surface before pressing them together. Connect the first upright to the parallel bar then lay them flat. After placing the glue inside the elbow on the second upright press it firmly onto the end of the parallel bar while holding all pieces flat. Assemble the feet, tees and caps separately. Once the feet are assembled, place glue inside the tee and firmly press the upright down into it while holding the feet perpendicular to the parallel bar. It helps to do this against a 90-degree corner. When you’re finished, you may want to rough up the surface of the parallel bars a little with sandpaper to improve grip.

If you travel and plan to take them with you for workouts, you may wish to skip the last step and keep the feet separate from the parallel bars and uprights so they can be disassembled and laid down flat for easier, more compact storage.